
How to Install Avaya IP Office Server Edition 9.1 on Vmware with ova template – Step by Step

How to Deploy Avaya IP Office Server Edition 9.1 Step by Step
So far Avaya has done excellent job and has designed many of their core application with Vmware ova file. I’ve seen Avaya AACC, Avaya Utility, Avaya CM and many more application now can be deployed with VMWARE ova template. This is one good step from Avaya which definitely saves number of hours for installation Engineer and have seen more productivity from the team.
Now today i’ll share my installation experience of Avaya IP Office Server Edition Deployment ova file (VMWARE) with you guys. I’ll not drag this conversation further long and let start the topic.
So as i said above this is article is all about How to Install Avaya IP Office Server Edition 9.1 or IP office Server Edition deployment or you can tag this topic as how to deployment Avaya IP Office Server edition on Vmware. I’ve download ova tamplete from official Avaya Website and it’s called ova file (Open Virtualization Application) you can Google it on OVA if you need further information on it.
Your downloaded file should look same as below image.
I’ve VMWARE Workstation 11 installed in my Laptop, which will be used to deploy our IP Office ova template.
This OVA template contains Linux Operating system and Avaya IP Office Server Edition Application.
So before we begin let me tell me recommended hardware or Vmware resources requirement for the deployment.
IP Office Needs required below listed recommended requirement.
4 Processors
8 GB RAM
100 GB Hard Drive
2 Network Cards
If you are planning to implement VmPro and Contact Recorder then you need extra Hard Drive space and Disk Partition on the server.
Since we are doing this installation for the LAB demonstration, i’ll use the minimum resources which should be enough for today.
So lets begin.
How to Install Avaya IP Office Server Edition 9.1
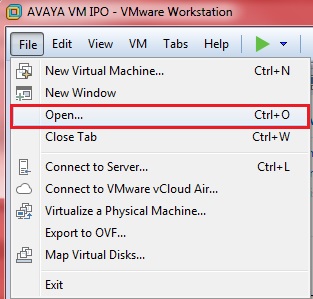
1) First we will launch VMWAR then click on File –> Open –> then select IP Office Ova template.
then select the IP Office ova file as shown below
Then before you click import, rename the machine as you desire (please note this is not the IP Office Hostname).

Then click “Accept” and once you click accept the import process will start, the process may take 5 8 minutes before the VMWARE makes the machine ready, so you need to have patience at this point.


Once the import process is finished, you should be able to see as below figure
the Vmware IP Office virtual machine is ready to boot, but as i mentioned earlier if it’s LAB you can reduce the recourses like RAM and Processor it’s your call. Once you are done with the customization please click on Power on Virtual Machine

As you can see below Vmware machine has take the ova tamplete and the Linux boot process has begun. the VM machine will start in between 1 or 2 time. and then it you come up the screen with the ip address indication. Please follow the below screen shots.


Now if you see the screen as below, that’s mean you basic installation has been done “Congratulations”
You can find the configured default ip 192.168.142.1. and 192.168.43.1 on LAN 2

After the installation you need to launch application for the initial system parameter
Open your Internet Explorer and enter the ip address with the port number
https://192.168.142.1:7071
This will take you to the IP Office system page as shown below withe following username password
username: root
password: Administrator (default)


Once you logged in, you should see the page as shown below. Click on Accept and then next

Select Primary Server Edition for this installation scenario.

Click Next

Now at the position you have change to change your IP Office ip address and the gateway address mention DNS IP address as well if it is available.

Enter NTP IP Address if it’s required.
Select if you are using A-law or u-law in your region

Now you need to pick the new password for the logins. please note down somewhere because you will need these password in daily routine maintenance.

Click Generate Certificate new

Link on one of the link below to install the certificate.

After the configuration is done, system will ask 8 minute time to reinitialize the new configuration and will redirect you to page again

After the system comes back in operational mode, please login to the following link to make sure all the core services are running
https://192.168.42.1:7071
Username: Administrator
password: the one your configure above

The page will load and will take few minute

Once the loading is done the below page will come up in which you will find all necessary information and can see all core services are in running mode.

Hope you have enjoyed and learned something from article please share and give your feedback.
If you are planning to buy Avaya Phones, i would appreciate to buy them from the Below Amazon Link


Thans mate 🙂
Welcome brother and thanks for your comment
exclnt post.. ALLAH bless on you.
Thank you for your wishes Baber
Keep visiting Integration-it.net
Thank you for taking the time to put this together. It was very helpful.
HI there
In the video you did, you got a “Password Disabled” error. How did you get to work at the end?
I have the same issue now
thanks
Hello Muhammad,
Thanks for this topic, Could I ask you about after I installed VM ware workstation 12 on my laptop and downloaded AEB 9.1.6 OVF from Avaya and importing this take a long time and after finish appearing a message to enable the Virtualization so need to enable this from Bios could please advise…..Thanks
Samer
Dear Samer
Thank you for Visiting Integration-it.net. Yes it seems the virtualization is not enabled on your Bios or perhaps your laptop dosent support virtualization. You can search on google with your Laptop brand.
You are free to ask anything you like
Best of Luck
Thanks Muhammad, I did all and it’s working
Hello Samer
Glad to know this article helped you
keep visiting us !!
Hi Team,
If we install Server edition primary, we can reg IP Phones directly ?? or we need server edition expansion also..what is the function of expansion and when we will use…it may use in branch office if primary is down ???
I am actually grateful to the holder of this web site who has shared this impressive article
at here.
Excellent it really helped me
Abu Muneed
Glad it helped you !!
Keep visiting back
I cant Login username: root with password: Administrator please help i want change the ehto settings
you should know your root password
1st login in IPO via ssh putty
Username: Administrator
password:
then login as root and enter your root password
this is great and helpfull .. well done team
Dear Sikandar
Thank you and keep visiting for more tutorials
Integration-it.net
Can you send to me the link download ABE_9_1_0_437_OVF10.ova ,because in avaya website https://support.avaya.com/downloads/download-details.action?contentId=C201412161654144420_1&productId=P0160
need user and password to download
thanks you so much!
Please contact me via contact US page
Thanks for this great tutorial. Do you have a torrent file for the IPO ova?
Thank you for visiting INTEGRATION-IT
Please contact us here https://integration-it.net/contact-us/
Hello
I need the iso of the IPO demo anywhere
I was try to download from official site but it’s need the Partner or customer ID which is nor available with me
Can you plz provide the direct link to download the IPO demo anywhere version