
How to do Avaya IPOCC Contact Recorder Configuration – Step by Step
IP Office Contact Center Recorder Configuration
Avaya IP Office now seeing in every Business premises. Since Avaya has released IP Office Server edition I’ve witnessed myself companies have replaced their Enterprise level Voice systems with single IP Office server. A system which is capable if handling 100 to 2000 users and can even expandable without even any hasle.
This doesn’t stops here, Integrating IP Office with IP Office Contact Center or IPOCC makes more powerful and attractive to business. So when it comes to Contact Center how could you forget the Recording part. Yes ! this article is all about configuring and Integrating your all 3 elements step by step
We will configure our IP Office + IPOCC + Contact Recorder. This document is very well prepared by Avaya, and im taking the opportunity to share with friends here
So lets begin
IPOCC Contact Recorder Configuration
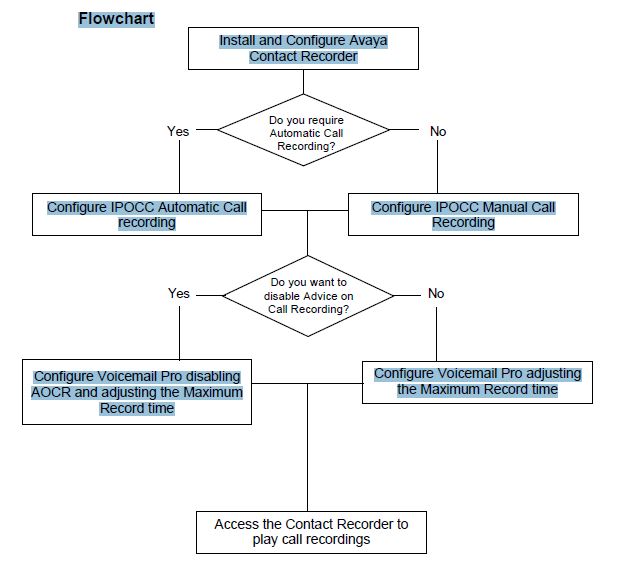
IPOCC Contact Recorder Configuration
Overview
IP Office has the ability of recording calls to a Voicemail box, when using Preferred Edition and Voicemail Pro. To further enhance this, Contact Recorder for IP Office can be used as a centralised call recording facility, which stores all recordings in a separate archive.
Contact Recorder uses a database that stores the call details associated with each recording stored. Call recordings are then accessed using a web browser interface, where recordings can be searched, displayed and the archived recording played.
Voicemail Pro is still used to record the actual calls, and once the recording is complete, it then passes the recording and associated details to the Contact Recorder Server.
By default, Contact Recorder is not installed on the Standard Application Server, as a separate drive or partition is required and cannot be shared with Voicemail Pro.
The following guide will demonstrate how to install and configure Contact Recorder on a Standard Application Server (Linux). Also how to configure the IP Office Contact Centre (IPOCC) to use Call Recorder, including the recording of calls automatically that relate to a Topic, and to record calls manually using the IPOCC User Interface.
Installing the Avaya Contact Recorder
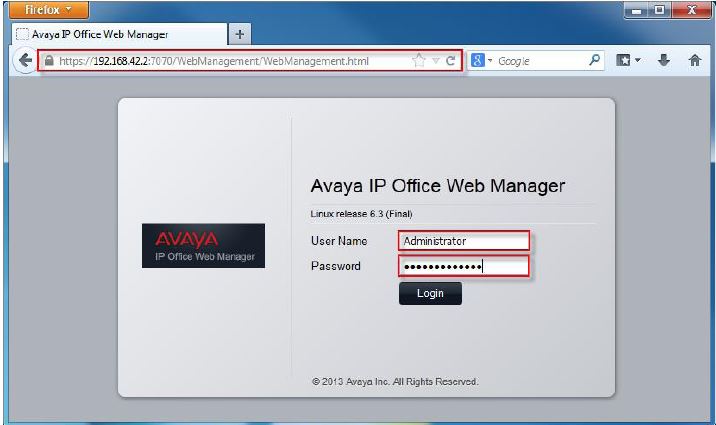
1. Using a Web browser interface, access the SAS Linux server using port: 7070, which will display the IP Office Web Manager Login screen. Login using User Name Administrator and Password Administrator.
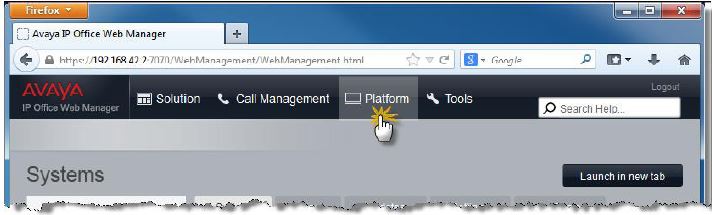
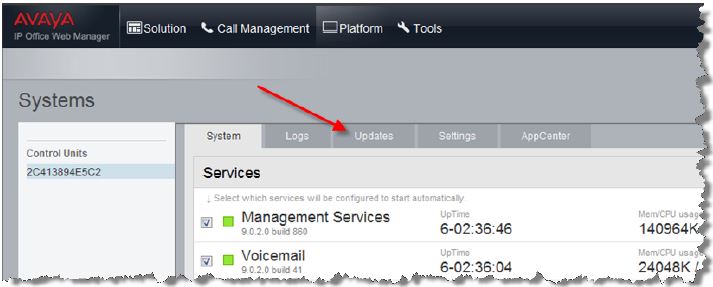
2. From within the Web Manager interface, select Platform.
3. The screen will display the System tab, displaying Services. Click on the Updates tab.
4. Under the list of available Services, you should see Contact Recorder. This will display the Status as not installed. Click on the option Install.
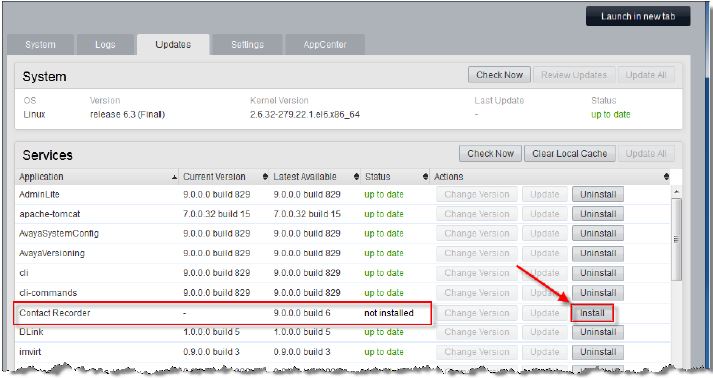
5. A message saying Updating will be displayed, while the Contact Recorder is being installed.

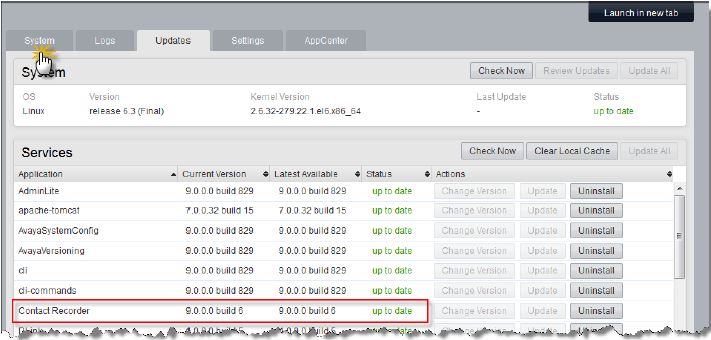
6. Once completed, the Status for the Call Recorder service will change to Up to date. Now click on
the System tab.
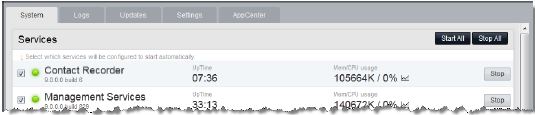
7. Contact Recorder will now be seen in the list of Services. Check the tick box, which will ensure that the service automatically starts after a reboot. Then click on the Start button.

8. The Contact Recorder service will now start, and can be configured.
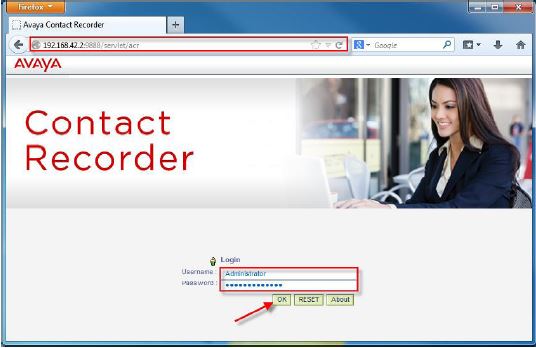
9. Using a Web Browser interface, browse to the IP address of the Server using port 9888, e.g. http://ipaddressofserver:9888. This will present the Login screen.
Login with the default Username: Administrator and Password: Administrator, then click OK.
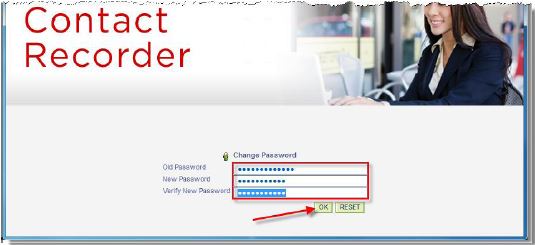
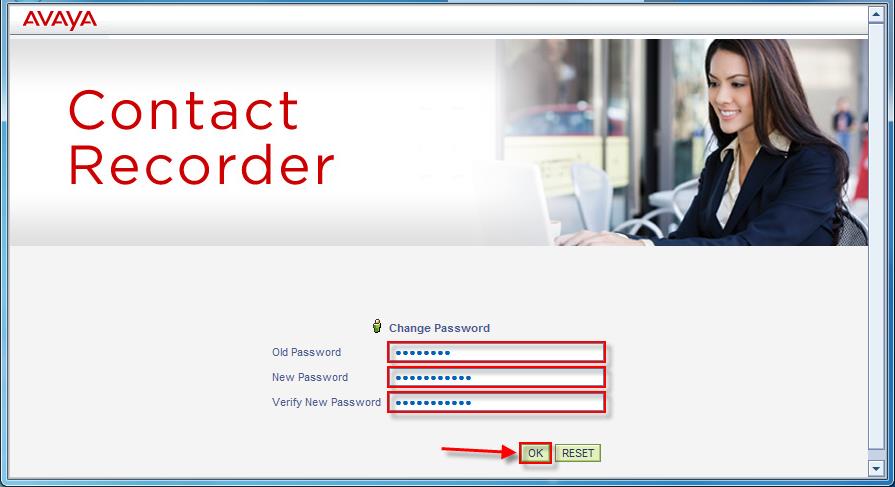
10. You will now be prompted to change the default Password. Enter Administrator in the Old Password field and enter the new password in the New Password and Verify New Password fields, then click OK.
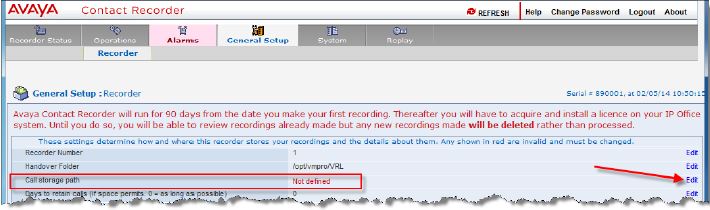
11. Once logged in to the Contact Recorder interface, click on the General Setup tab.

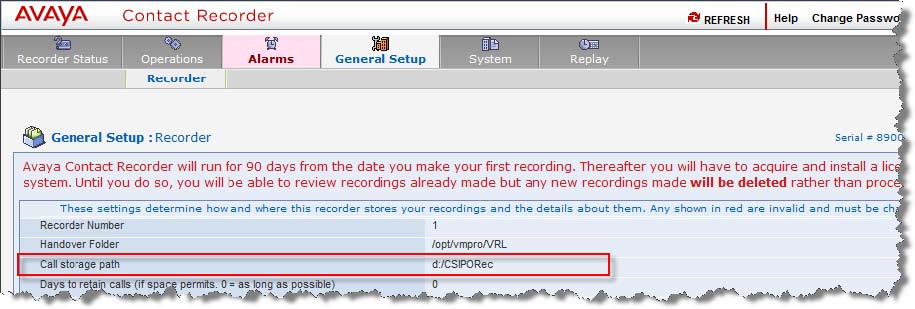
12. You can see that the Call storage path has not been defined. Choose the edit button.
13. Enter the Call storage path (the default path created when installing Contact Recorder is /CSIPORec). Please note that this should be on the second drive installed on the Standard Applications Server, as it must not be a shared drive with VM Pro. Next click on the Enter button.
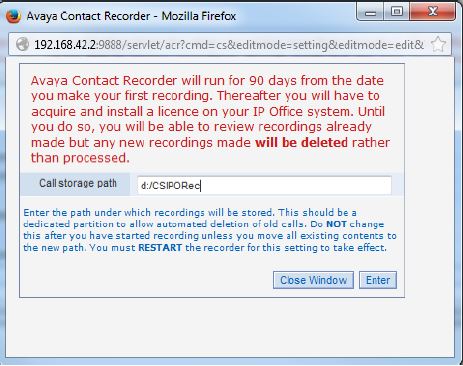
14. The new Call storage path is now seen.
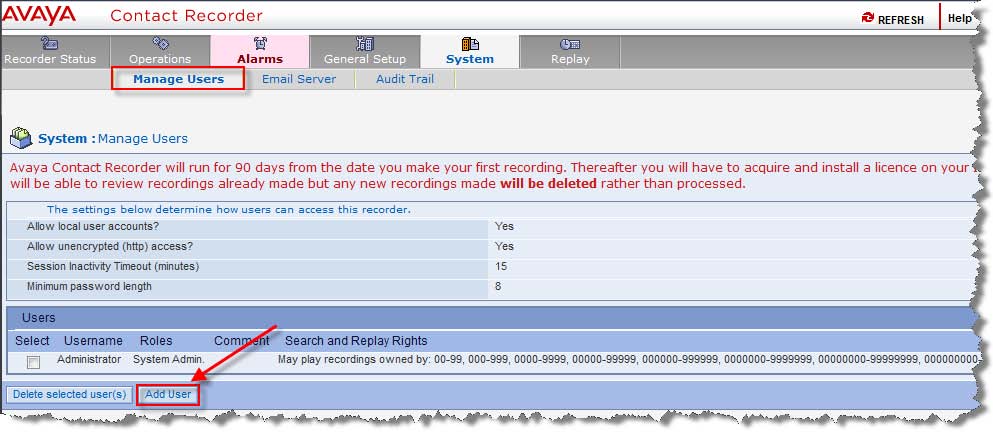
15. Next click on the System tab.

16. You will be presented with the Manage Users screen, where it is possible to create Users with administrative rights, or who will have the ability of searching for and playing recordings, etc. Click Add User.
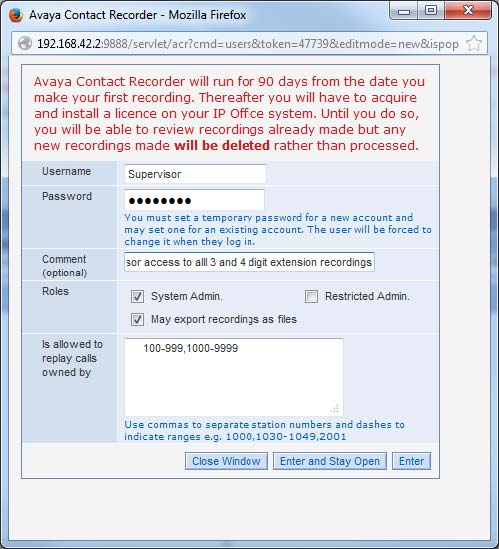
17. A new dialogue box will be presented. Add the User settings as follows:
a. Username: the Login name for the new User
a. Username: the Login name for the new User
b. Password: Enter a password for the User to Login.
c. Comment. This is optional only, and not a requirement.
d. Roles: Select either System Admin or Restricted Admin. You can also select to give the User the ability to export recordings as files.
e. For the section on which extensions the recorded calls can be replayed from, these can either be added in the form of a range, e.g. 2000-2500, or individually being separated by a comma, e.g. 2000,2001,2002.
Click Enter when all the settings are completed.
18. The New User is now added to the list. Click Logout to exit the application.

Configuring IPOCC with Contact Recorder
Now that the Contact Recorder has been installed and configured, a process can be created in IP Office Contact Centre (IPOCC) to enable the Call recording.
Automatic Call Recording
1. Launch the IPOCC User Interface and log in with a User account that has access to configuration.
Automatic Call Recording
1. Launch the IPOCC User Interface and log in with a User account that has access to configuration.
2. Click on the Go to command and select Configuration from the drop down menu.
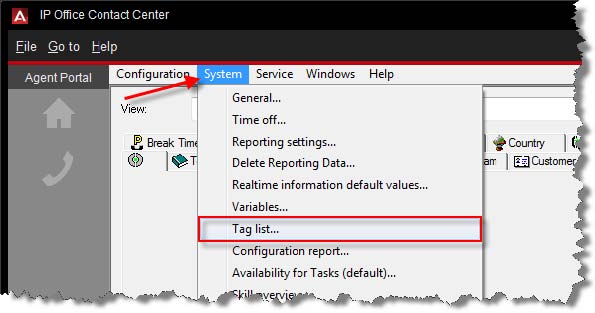
3. Then Click on the heading System, and select Tag list… from the drop menu.
4. The Defined tags dialogue box is presented. Click on the Add button.

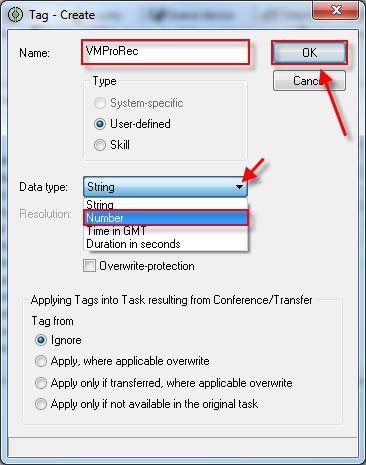
5. In the Tag – Create screen, enter the Name “VMProRec” (it’s important to ensure this is exactly as shown). Change the Data type to Number and then click OK to create the Tag.
6. Then click OK on the Defined tags dialogue box to close it.
7. Now click on the Topic tab rom within the Configuration screen.
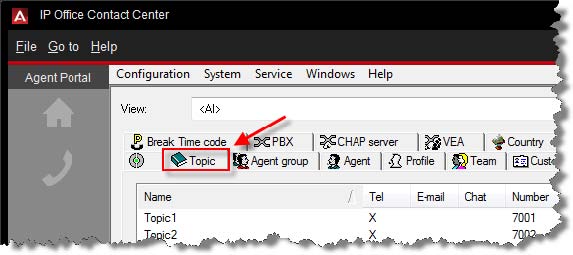
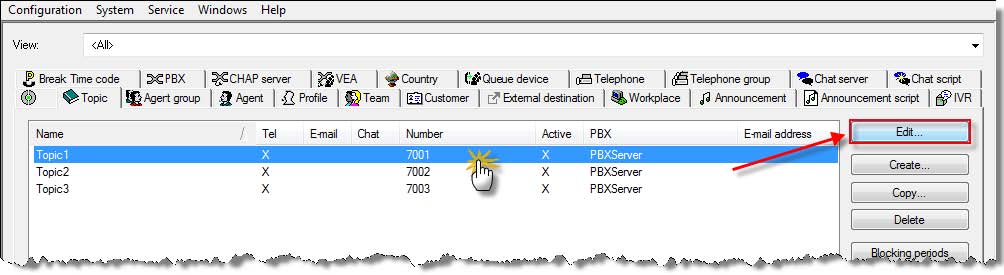
8. Select and double click on a Topic to be used or select and click Edit.
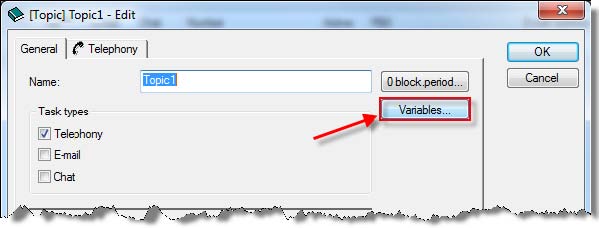
9. Choose the Variable button
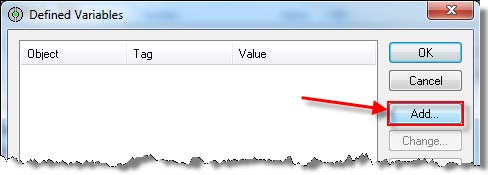
10. Choose the Add button
11. Click on the builder button  next to the Tag field.
next to the Tag field.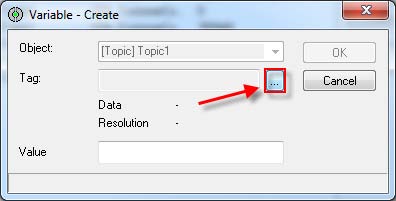
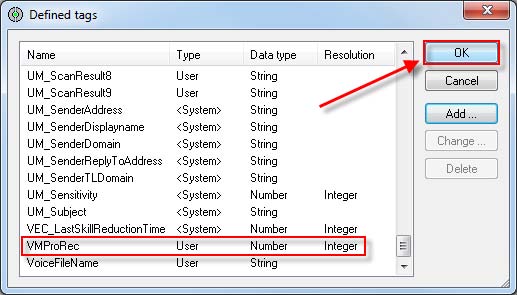
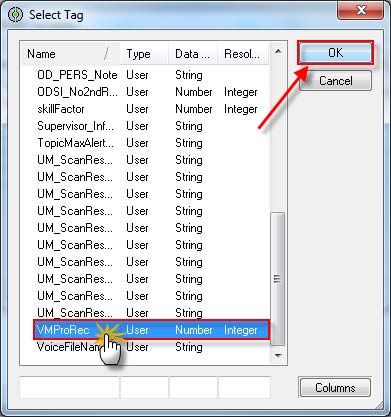
12. This will present the Select Tag dialogue box, showing the list of Tags available. Scroll down to find the VMProRec Tag, click to select this and then click on the OK button.
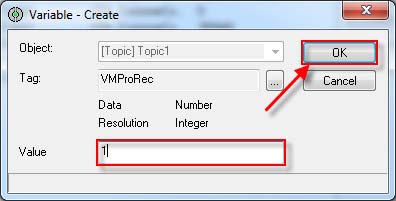
13. Now in the Value field, enter 1. This relates to using the Voice Recording Library, where the call recording will be sent. The options available for the Value field are:
1 = Voice Recording Library (VRL)
2 = Voice Recording Library Authenticated (VRLA)
0 = Mailbox
Another option is to enter a specific Extension number, which will then pass call recordings to the mailbox for that extension.
Once value has been selected, click on the OK button. Then click OK on the Defined Variables screen, and also for the Topic to close them.
Any Calls that are now sent to the Topic will automatically be recorded.
Manual Call Recording Using the IPOCC User Interface
Calls can also be recorded manually by an Agent, instead of being set to record all calls to a Topic. This will allow calls being made by an Agent also to be recorded.
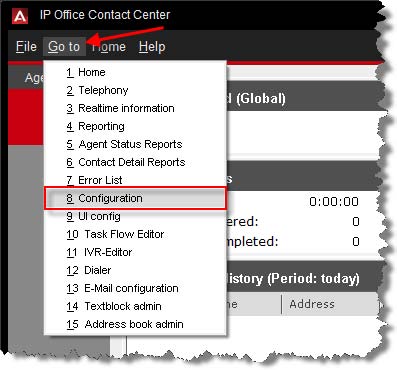
1. How to Manually Record calls for an Agents GUI. Using the Go to menu choose 8 Configuration.

2. Choose Configuration and choose External destination

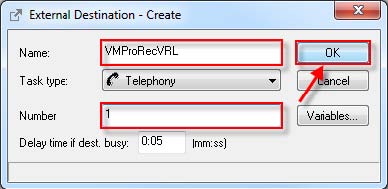
3. Choose the Create Button
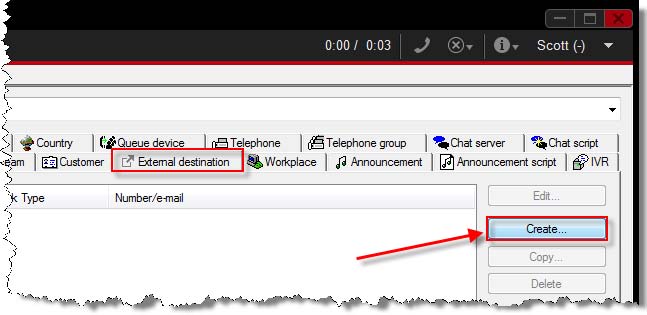
4. A new dialogue box will appear to create an External Destination. Enter the same name used in the Call Record Tag, “VMProRec” as part of the name. For example, VMProRecVRL, differentiating the tag name with VRL. Then add 1 in the Number field, and then click on the OK button.
1 = Voice Recording Library (VRL)
2 = Voice Recording Library Authenticated (VRLA)
0 = Mailbox
Another option is to enter a specific Extension number, which will then pass call recordings to the mailbox for that extension.
2 = Voice Recording Library Authenticated (VRLA)
0 = Mailbox
Another option is to enter a specific Extension number, which will then pass call recordings to the mailbox for that extension.
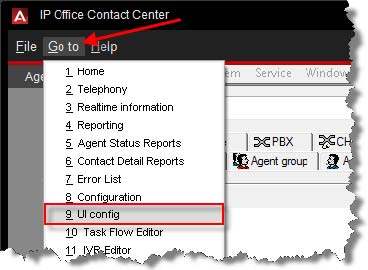
5. Next click on the Go to command and select UI config from the drop down menu.
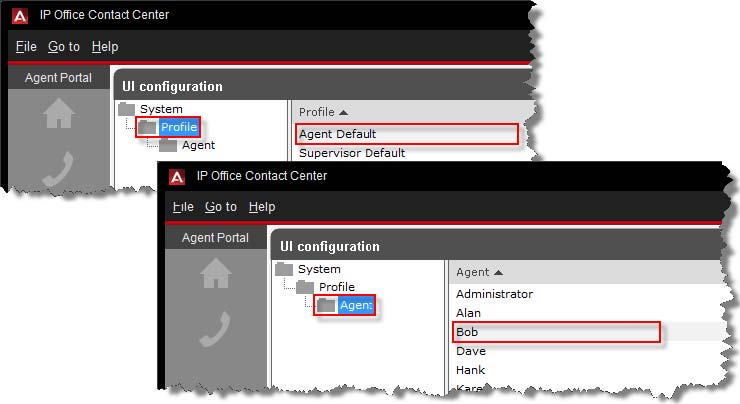
6. Then select either a Profile or a Single Agent, and double click to open.
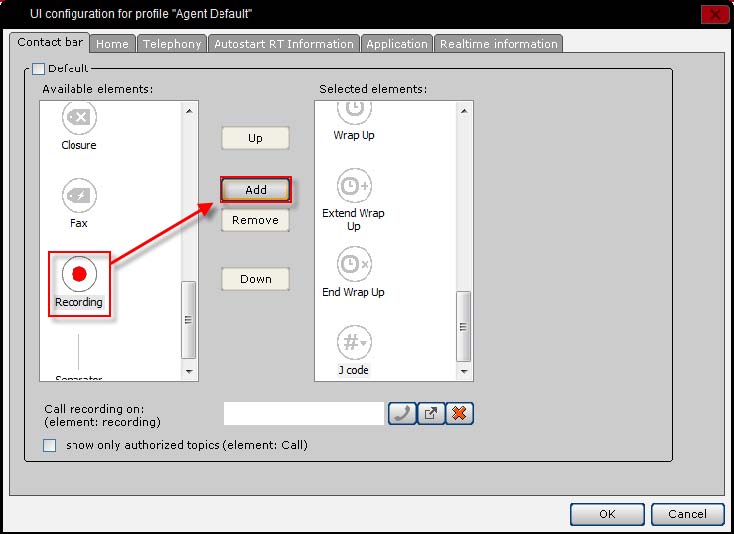
7. On the UI configuration screen, uncheck the Default tick box.

8. Scroll down the list of Available elements and select Recording, then click on the Add button.
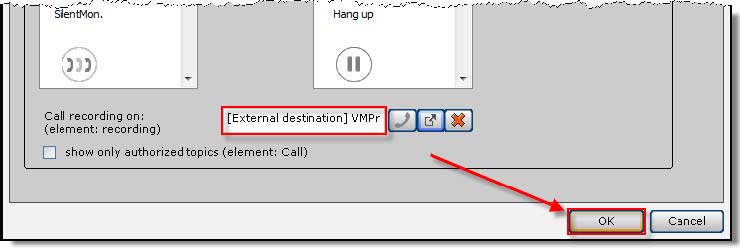
9. Then click on the middle button next to the Call recording on field, which will present the available External destinations created.

10. From the next dialogue box select the VMProRecVRL external destination earlier created, and on the OK button.

11. The External destination will now be added to the Call recording on field. Click on the OK button to continue.
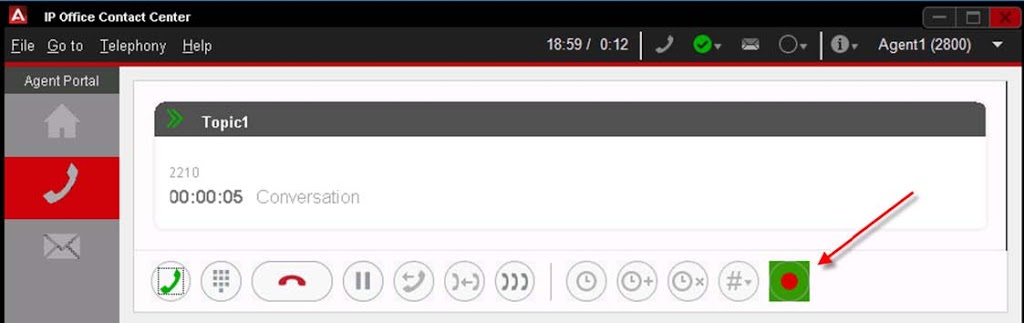
12. When anyone matching the Profile or a specific Agent logs in to the IPOCC User Interface, they will now see on their Contact Bar the Recording button, giving them the ability to manually turn on Call Recording during an active call.
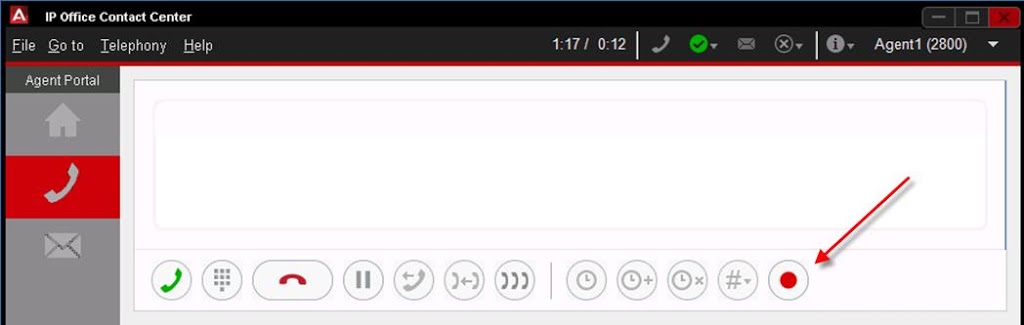
13. The User can activate Call recording by simply clicking on the button to commence recordong (button then shown with a green outline), and to pause or cancel the recording by clicking on the button again.
Voicemail Pro Configuration
By default, Call Recording plays a system announcement from Voicemail Pro to warn callers that their call is being recorded. This Advice on Call Recording (AOCR) can be disabled from within Voicemail Pro, so that silent recording is implemented. Please ensure that you comply with legal requirements regarding Call Recording if AOCR is to be disabled.
By default, Call Recording plays a system announcement from Voicemail Pro to warn callers that their call is being recorded. This Advice on Call Recording (AOCR) can be disabled from within Voicemail Pro, so that silent recording is implemented. Please ensure that you comply with legal requirements regarding Call Recording if AOCR is to be disabled.
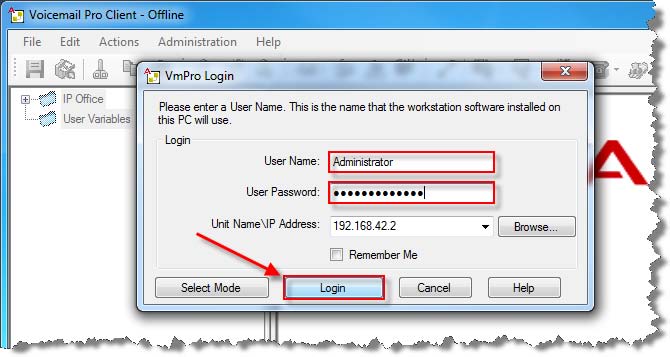
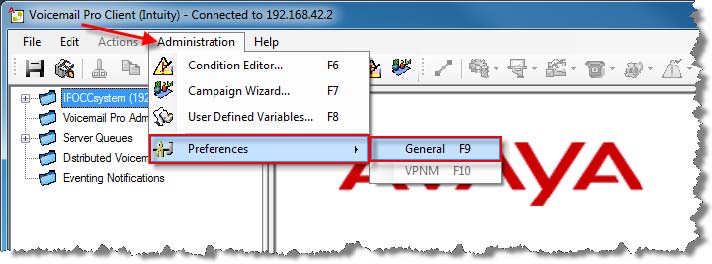
1. Using Voicemail Pro Client, connect to your VM Pro Server and login using the Administrator account (Username: Administrator Password: Administrator (default)). Then click on the Login button.
2. Then select Administration and the choose Preferences and the General.
3. The System Preferences dialogue box will be displayed. Under the General tab, uncheck the tick box Play Advice on Call Recording.

4. As soon as the tick box is unchecked, a warning message will be displayed regarding legal requirements to inform callers of call recording. Simply click Yes to close this screen.

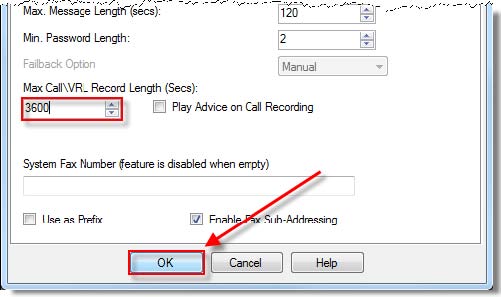
5. You may also want to increase the Max CallVRL Record Length (Secs), as the default may be too short. The maximum record length is 18000 seconds (5 hours). Once set, click OK
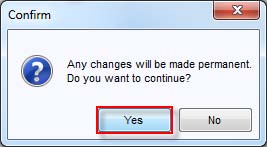
6. Then choose Save and make Live
7. The Confirm screen will appear stating that changes made are permanent. Click Yes to continue.
This completes the configuration of Voicemail Pro with regard to Call Recording
Using Contact Recorder
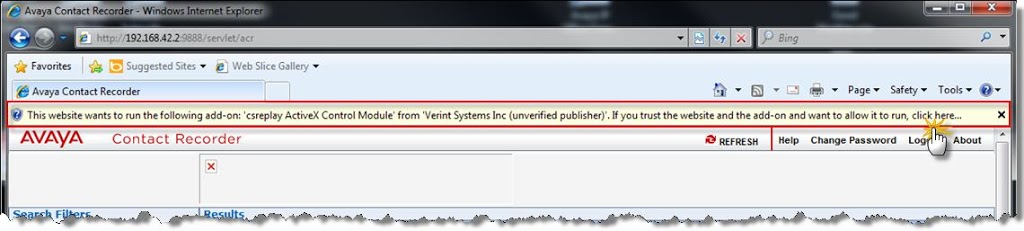
The use of Contact Recorder for play back functionality requires Internet Explorer 7 or higher. A number of Active X Controls are also needed and for the ability to Replay recordings.
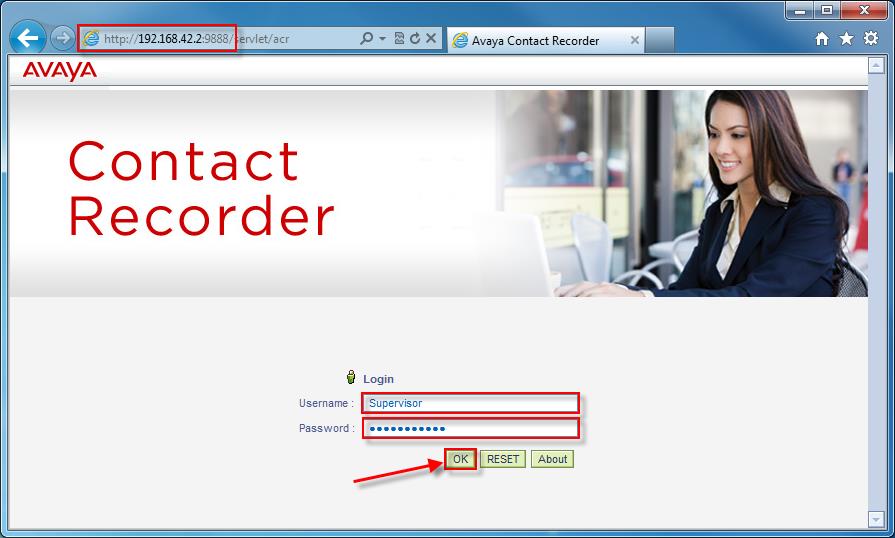
1. Using a supported version of Internet Explorer, browse to the IP address of the Call Recording server followed by port 9888, e.g. http://<IP Address>:9888
The Contact Recorder login screen will then be displayed, so enter the Username and Password of a User with access to play call recordings, and click OK.
The Contact Recorder login screen will then be displayed, so enter the Username and Password of a User with access to play call recordings, and click OK.
2. The first time you log in as a User, you are prompted to update your password. Enter a new password and click on the OK button.
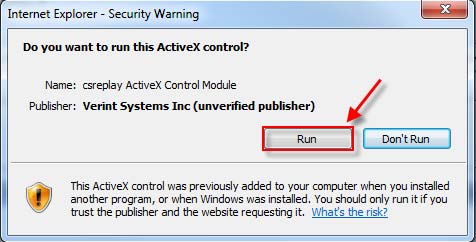
3. The Contact Recorder software uses an ActiveX Plug-ins which will need to be loaded the first time. Click on the caution message displayed to install the ‘csreplay ActiveX Control Module’.
4. You will then be prompted with an options menu. Select Run Add-on to install the Module.
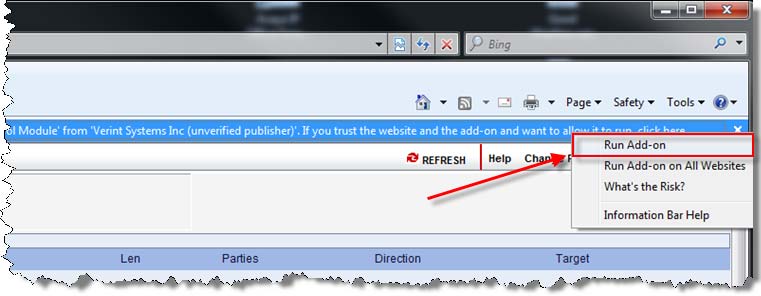
5. When the Security Warning is displayed, click on the Run button.
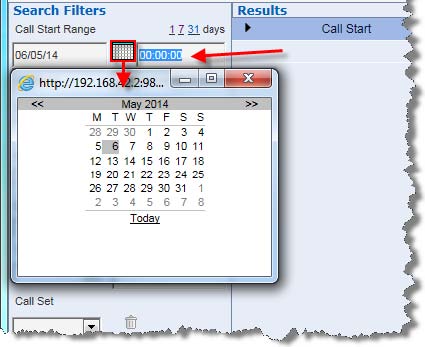
6. The next stage is to search for calls based on either a selected date (Start and End) using the calendar entries, or by choosing the links for the current day, last 7 days or 31 days. If you wish to specify a date then click on the calendar icon
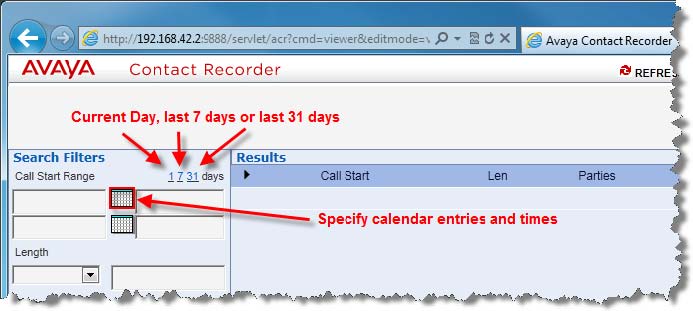
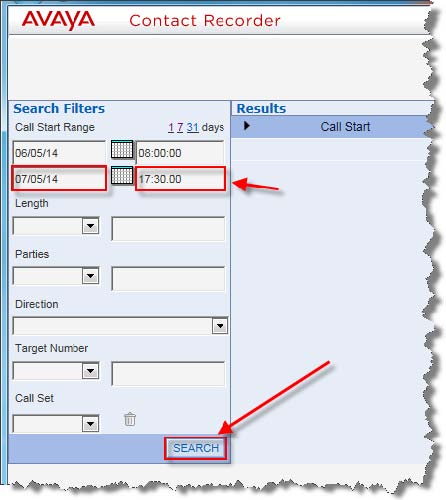
7. Once the calendar icon has been clicked on, select a start date from the calendar screen displayed. Also ensure you add a start time.
8. Follow the same process to assign an End date and time. Additional filters are available to isolate call recordings that match the criteria entered, but these are optional only. Once the details are entered, click on the Search button.
9. Any recorded calls that match the criteria will be displayed on the right. Select the call recording that you wish to listen to, by checking the radio button next to the call detail. You will then see a call graphic image at the top of the screen, and when you move your cursor to this area, a series of buttons available.
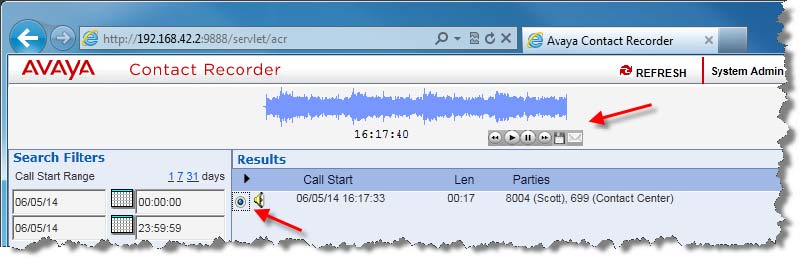
10. If you move the mouse cursor over the graphic the playing options for that recording are displayed.
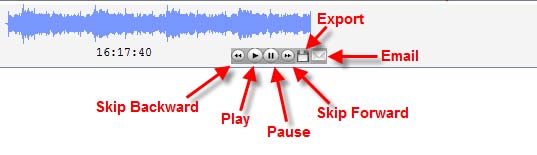
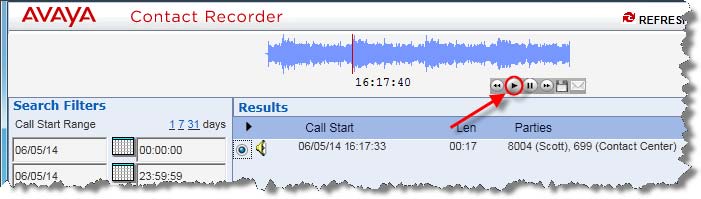
11. Click on the Play button to play the recording.
Alright Folks im sure you nw you have just learned that “How to do Avaya IPOCC Contact Recorder Configuration – Step by Step”
Please Like Share and Comment


4 Comments
Very helpful post thanks a lot.
Satyendra Singh
Thank you and keep visiting https://integration-it.net
Hi
I need to show IPOCC Job code in contact recorder replay page. How can we do it
Dear Sanjith
I don’t think the job code can be displayed.
Check if you have layout builder available and you can look for the job code field